This page is part of the MakerScanner series (<< previous in series | next in series >>)
Viewing and cleaning scan data
View it
We use MeshLab (http://meshlab.sourceforge.net/) to view and mesh scan data. Go ahead and download it from the site if you're on Windows. Ubuntu users can use apt-get:
sudo apt-get install meshlab
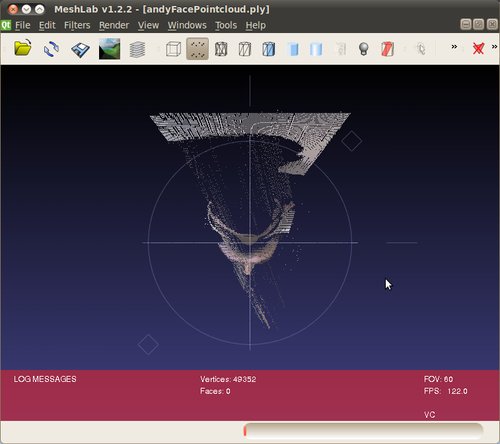
Start it up and select your file. You should see something like this:
Navigation in MeshLab is pretty simple:
- Left-click + drag: rotate view
- Mouse wheel: zoom
- Middle-mouse button click + drag: pan view
- Alt + mouse wheel: change box (voxel) size
Go ahead and try these now and take a look at your scan. If you're
happy with it, see the next section for cleaning up the noise!

Clean it
Generally, your scan will have some noise. Probably you can see the flat wall behind your scan and some other points. We're going to use Blender 3D to remove these points.
Install Blender 3D
- Windows: head over to http://blender3d.org and download their latest package.
- Linux: On Ubuntu you can apt-get it:
sudo apt-get install blender
Open your scan
Start Blender. When it first comes up, it has a box in the middle.

Delete the box by pressing the Delete key and select Erase Selected Object(s).

Select File > Import > Stanford PLY (*.ply). Navigate in Blender's funny file viewer to your file and click Import PLY.

Once it is done, you will probably not see anything. Zoom out using the mouse wheel to view your points.

Edit your scan
Press [Tab] to enter edit mode. You will
see your points turn yellow. If this doesn't happen, you might need to
select your object before pressing tab, which you can do by right
clicking on it.

Move the scan points to the center of the screen by pressing the [g] key and dragging.

Press the [a] key to de-select all the points. They will change color to be purple.

Delete points
To delete noise points, we are going to:
* select them using the box function ([b])
* delete them using the [Delete] key
To change your view on the model, press and hold the mouse whee while dragging your mouse.

To select points, press [b] and drag a box.

To delete points, press [Delete] and select Verticies

Repeat this process until you are left with just the points that you want.

Quick tip: if you press [b] twice, you can
"paint select." Change the size of the circle with your mouse wheel.
Right click to stop paint selecting. Also, if you hold [Shift] when pressing the middle mouse button and drag your mouse, you can pan the view.

Make sure to get points that are outliers far from the model.

Once the model is cleaned, we're ready to save it and move on to Meshing!
Save file
First save the file as a .blend so you can edit it later if you want. Select File > Save and name your file.

Export to .obj
To move the file back to MeshLab, we use the .obj format. Press [Tab] to exit edit mode, and select Wavefront (.obj). Press Export Wavefront OBJ. When the window comes up, press Export.


Fantastic! Now you're ready to mesh your file so you can print it!
This page is part of the MakerScanner series (<< previous in series | next in series >>)