This page is part of the MakerScanner series (<< previous in series | next in series >>)
One of our favorite parts about the MakerScanner design is that you can 3D print almost all of it!
Before you start
Here's what you'll need to build your scanner:
Parts
- PS3 Eye USB Camera
- Laser line pointer
- 2 AA battery holder
- 2 AA batteries
Tools
- MakerBot 3d printer
- Soldering iron
- Electrical tape
Print it
There are 5 things you need to print and 4 designs (you need two of the connector pieces.)
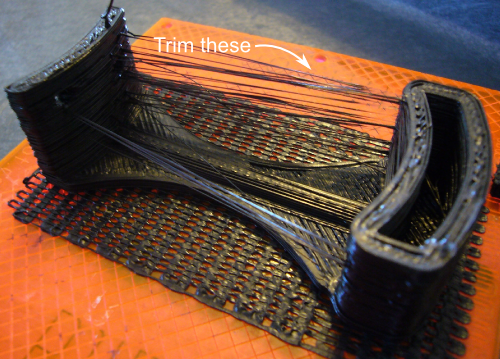
Camera holder
Grab the STL file for the camera holder here. Print it like you would any other Makerbot part. If you're new to Makerbot printing, you might want to check out the how to print page.

The MakerBot tends to leave some extra lines of plastic across the gaps so you need to trim that off before you put the camera in. If you don't trim those, the camera won't fit and might break your part when you try to put it in.
Connector pieces (2x)
The next thing to print is two of the connector pieces. Grab the file here. Again you should trim the lines otherwise the connector pieces won't fit.
Don't forget to print two! Make sure they fit together.

Laser mount base
Grab the STL. Not much you have to do here, just print it!

Laser mount top
Grab the STL. Print it!

Put it together
First, connect the parts together with the built-in printed connectors. It is a good idea to connect a connector piece to the camera mount before putting the camera in, otherwise it is hard to fit it all.

Now fit the rest of the pieces as shown. It should take moderate pressure to make them fit. If you think you are pushing too hard, check that the connection areas are well trimmed.

The PS3 Eye has two zoom levels. Set yours to the zoomed out one (the blue dot on the barrel).

For the pin on the laser hinge, we use a piece of MakerBot feedstock plastic. Cut it to be about 0.95 inches (2.4cm) long, which if you don't have a ruler handy is about the diameter of a quarter. Put the pin in the bottom mount and press firmly, so that about half of it sticks out.


Next, mount the laser in its holder. You might want to wrap some electrical tape around the laser so that it fits snuggly but you can still rotate it.

Finally, put the laser mount on the base. Completed!

Head over to the software page to start scanning!
This page is part of the MakerScanner series (<< previous in series | next in series >>)